Learning Photoshop is not that difficult after all. We learned about the different tools, the different panels, and the basics of colors. There is this feature of Photoshop wherein we can style out layers differently. We can actually dress up layers like how we want it to look like. This article will feature the layer styles and how you can use them to your own liking.
Layer Styles, What are they?
Did you think that Photoshop can only make photos look great? Photoshop can extend its reaches to layers, too. But before you go deeper into the realms of layer editing, you should first learn how to blend or in simpler terms, you need to know a thing or two about basic editing because layer styles are one of the most obvious edits in Photoshop.
How can I stylize my layers?
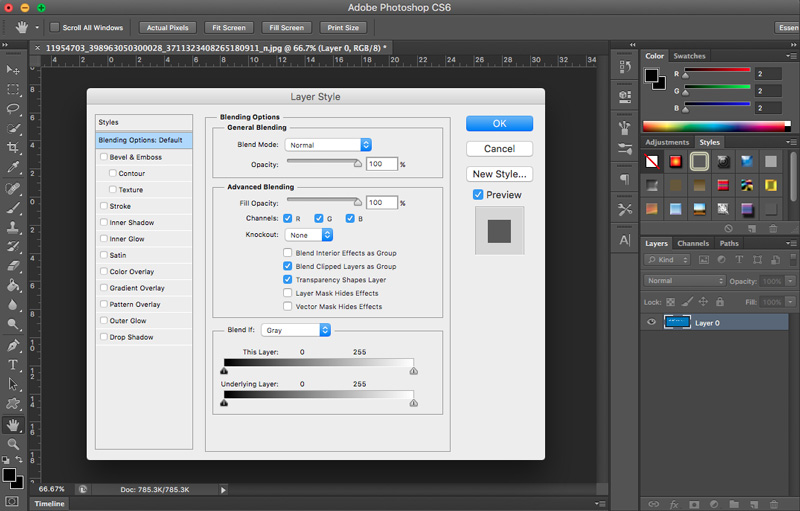
Like any other program, Photoshop has a default made-up set of styles that you can choose from. But of course, you can manually design your layers. All you have to do is to go to a layer in the layers panel, right click the name of the layer you want to put design to, and then select Blending Options. This will pop a dialog box with reference to the layer style you want. This is also great for people who want tailor-fit designs made just for them.

Once it pops up, you will see a lot of options that you can tweak but for now, we will stick with only to how you can style layers. We will discuss this deeper in next articles of this Photoshop tutorial. But let me list down what you will see when you select the Blending Options button.
- Drop Shadow
- Inner Shadow
- Outer Glow
- Inner Glow
- Bevel and Emboss
- Contour
- Texture
- Satin
- Color Overlay
- Gradient Overlay
- Pattern Overlay
- Stroke
There is also what we call presets. These are the sets of styled layers that Photoshop provided for you; so that you will just choose a style that would fit your taste. To see the different presets available for you, go to Windows > Styles and then open the Styles Palette. With the text layer of yours selected, just click on the layer and Photoshop will automatically attach that preset for you. Do not worry about undoing because there is a preset layer that is naked – not the naked that we all love but the undersigned type of naked, no style, no edit.
Can I make my own presets?
Because you can make your own presets, you can save them in order for you to access them even in a new project. You can save it in the Layers Palette by pressing the dropdown menu from the Styles Palette (top left, three vertical lines, arrow pointing down) and then select Save Styles… You will then now be redirected to choose a name and location on your computer for the preset file.
You can load your presets as well! The easiest way is to open a blank Photoshop document, and then drag the file. If you downloaded preset styles, make sure to have the .ASL file as well. Once accomplished, find the .ASL file in your computer, drag it onto the Photoshop window; it’s that simple.
Final Tips and Tricks
- There are a lot of downloadable ASL files ready to be used. These are made by amateur – professional people who are well-versed in Photoshop so be acquainted with it.
- You cannot add layer styles to locked layers. To unlock a layer, simply double-click the name of the layer in the layers panel and then press ok.
- Layer styles are there for text and are more preferred to be used on bold This emphasizes the intensity of the text; making it look more strong and expressive.
- You can actually copy layer styles into different layers. You can right click the name of the layer that you want the style copied from, select Copy Layer Style and then right click to the layer where you want the style to be pasted to and select Paste Layer Style.
- Have fun and experiment with the different styles and create your own!
Stay tuned in order to know how to manually design layer styles for you to look like and become a pro in managing and creating layer styles.