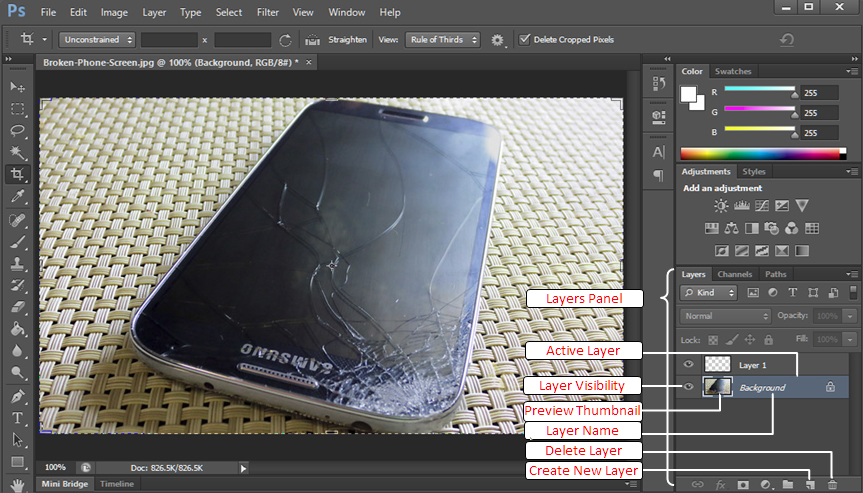
So in the first lesson, we have learned how to deal with the different tools, its use, and how it is important in Photoshop. In this lesson, we will learn everything about what we need to learn in the bottom right side of our panel which is called the layer panel. Here in this panel is everything you need to know about layers, how important it is, and a few tricks to add up in your arsenal. Now, let’s take a closer look at that.
Layers Panel

If you take a look at the right hand-side of your Photoshop, you will notice three categories on the bottom right part of it namely: Layers, Channel, and Paths. The Layers Panel will be the focus of today’s lesson. Whatever you see on the canvas is the preview thumbnail you will see in the Layers panel.
Layer Name
The name on the Layer depends on what you name it but by default, it follows what has already been created. By default, the first photo that you attach to the canvas will be named “Background.” This is because it serves as the backdrop for the project you are about to do.
Preview Thumbnail
The preview thumbnail is responsible for having your back when you switch to different layers. The preview thumbnail displays on the left side what color, image, or design you have on that specific layer. So if you have the wanted background on that layer, make it as your background layer manually and to do and know this, continue reading this tutorial…
Adding New Layers
Adding layers is simple as ABC; what you need to do in order to add layers is to just simply click it on the bottom right part of the layers panel. New layers are automatically added above the background layer and it is as well, automatically named by Photoshop.
Shortcut to new layers – Ctrl + Shift + N
Copying Layers
Who said copying isn’t allowed in Photoshop? You can copy layers to have two or more exactly similar layers on your panel. To copy the layer, click and hold on the layer, and drag it down onto the new layer icon on the bottom right part of the panel. It is by default to become the active layer and will also go on top of the layer you have copied it from.
Shortcut to duplicate layers – Ctrl + J
Moving Layers
If you do not know, you can actually move layers to adjust what you can see in the canvas. For example, you want to change the background of the work, you have to move the layer at the bottom so that it will be the layer that will be less seen in the canvas. To do this, all you have to do is to drag a layer moving upwards or downwards depending on how you want to adjust it. When releasing, wait for it to be highlighted to know that it has been moved successfully.
Active Layers
This is important because it is very crucial for editing. To know what layer is active, you have to observe and see what layer is highlighted in the panel. What you do inside the canvas of your work only goes to what layer you are on.
For example, the active layer is layer 1, all the editing, the moving, the erasing, etc. would only be done to layer one. So when you erase, you do not have to worry about other layers being damaged or whatsoever because the active layer would only be the layer that is subject to change.
Also, when you copy or duplicate a layer, Photoshop will automatically detect the active layer to be copied so you better have an eye on what layer is active to avoid confusion.
Deleting Layers
Just like adding layers, deleting layers is simple. All you have to do is to click on the layer you want to delete, and then drag it to the delete icon on the bottom right part; the trash bin icon is the delete icon.
Shortcut to delete layers – Click on the layer you want to delete and press “Del” or delete on your keyboard.
Renaming Layers
Although Photoshop names your layers automatically, it would be difficult and quite confusing if you just follow the default naming of Photoshop. You can actually rename a layer by double-clicking the layer. It then automatically leads you to rename the layer of your own personal choice.
Layer Visibility
Of course, when the layer you are on or the layer you are eyeing does not have the “eye” or the visibility on, you would not see it on the canvas unless you have it visible. Do not be confused when you do not see what you want to see just because you just added it, maybe the eye icon is not present which leads us to the fact that it is not visible. The small box on the left side of the preview thumbnail is where the eye should be to know if it is visible or not.
So now we are done with the layer panel, you are now done with a few baby steps in becoming the Photoshop Virtuoso. Follow the blog to stay tuned for more tutorials in Photoshop and other programs.
Read Also: How to apply blur effect in certain part of the image using Photoshop